Run the neaPay ISO8583 converter to JSON, XML, SQL, in a test environment
Posted on 25th Jan 2019 7030 views
Once you have received and successfully downloaded your ISO8583 converter from neaPay, deploy and run is easy: use/deploy java 8; unpack delivered converter; start converter; start client simulator; run transaction and check response
Running transaction with the neaPay ISO8583 converter is as easy as running the simulator.
In test mode, you can enable the User Interface and you can do everything by mouse click.
Go to the deployment folder where you have unpacked your converter and make sure you have converter_ISO8583_JSON_XML_SQL_PRO
If you use a simulator, then you need to also have an instance of simulator_ACQUIRER_ISO8583_client_PRO
If you are using your locally installed java, make sure you have Oracle Java 8 installed. If you want to use our version download from here java 8 and place it next to the simulator and converter https://neapay.com/download.html . The folder will be named jre1.8
Your deployment folder should look like this:
jre1.8
simulator_ACQUIRER_ISO8583_client_PRO
converter_ISO8583_JSON_XML_SQL_PRO

Run in test mode
Go into the converter folder and execute start_neaPay.bat. For MAC and Linux use start_neaPay.sh. A new window called ISO8583 Converter will start. If you are using local java, adapt your startup script to point to the java location bin directory. Example below for windows
..jre1.8binjava -jar neaPayCorePro.jar
If you are in console mode, the converter starts automatically. If you are in window mode, press the Start button at the top left of the converter (Green Play button) and wait until the Console shows a message ISS: Issuer starting, TCP Server starting. Your Issuer/Converter has started.
07:34:42:433:CNV: Converter starting, TCP Server starting
07:34:42:454:SYS:21/Server connection started on port:9009
07:34:42:454:SYS:Server Connections started:TCPChannel
07:34:42:456:
07:34:42:458:CNV: Start an ISO8583 Acquirer simulator [ neapay.com/iso8583simulator.html ] and connect it to port 9009
07:34:42:459:CNV: Waiting for incoming ISO8583 messages on port 9009
07:34:42:460:CNV: Converted HTTP JSON messages are sent to URL HOST :https://neapay.com/api/rest-host/
Start the neapay simulator for incoming ISO8583 messages. https://neapay.com/post/run-iso8583-simulator_7.html
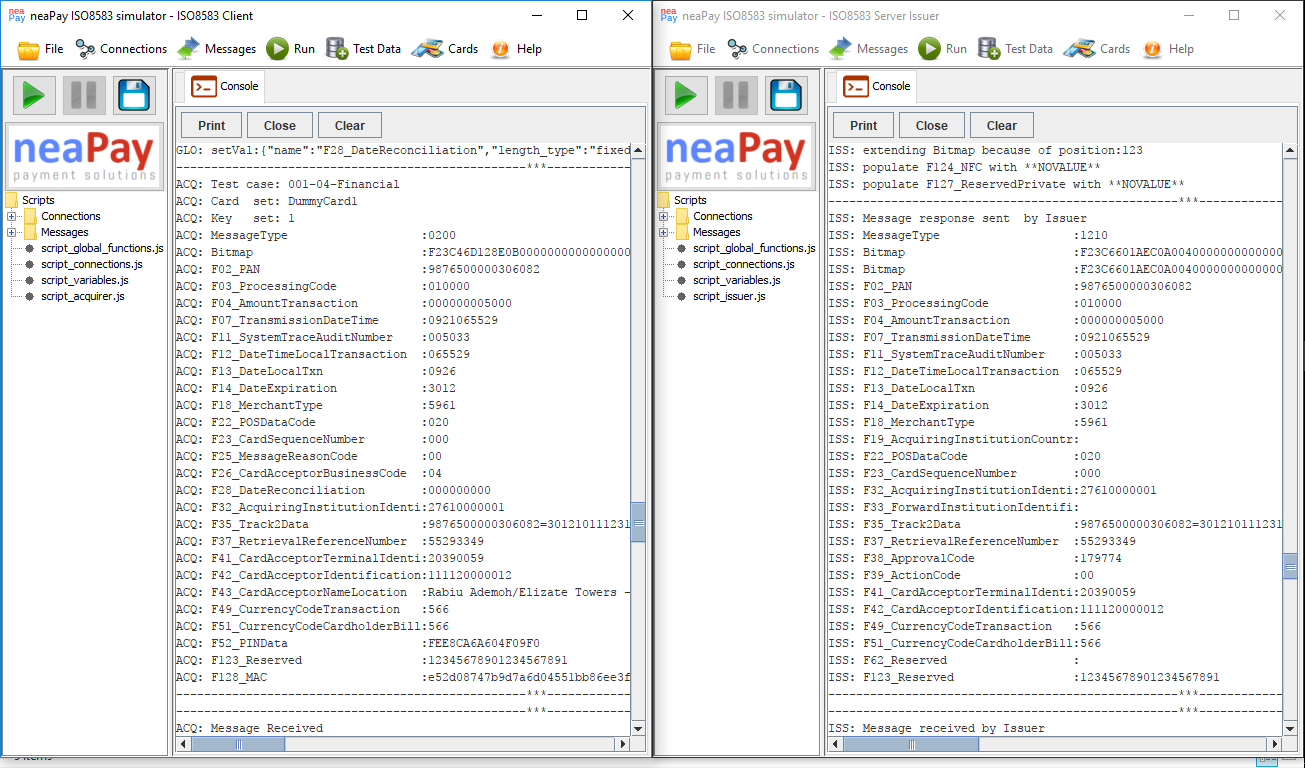
Check the Issuer/Converter that it has accepted the connection "Server socket accepted on port ..."
Select a transaction from Acquirer simulator Transactions List and click the Send button.
Check the Acquirer Console that an ISO8583 message has been built and sent to the server.
Check the Converter logs that it has parsed the message successfully and built a response.
Check the Acquirer ISO8583 simulator that it has received the response.
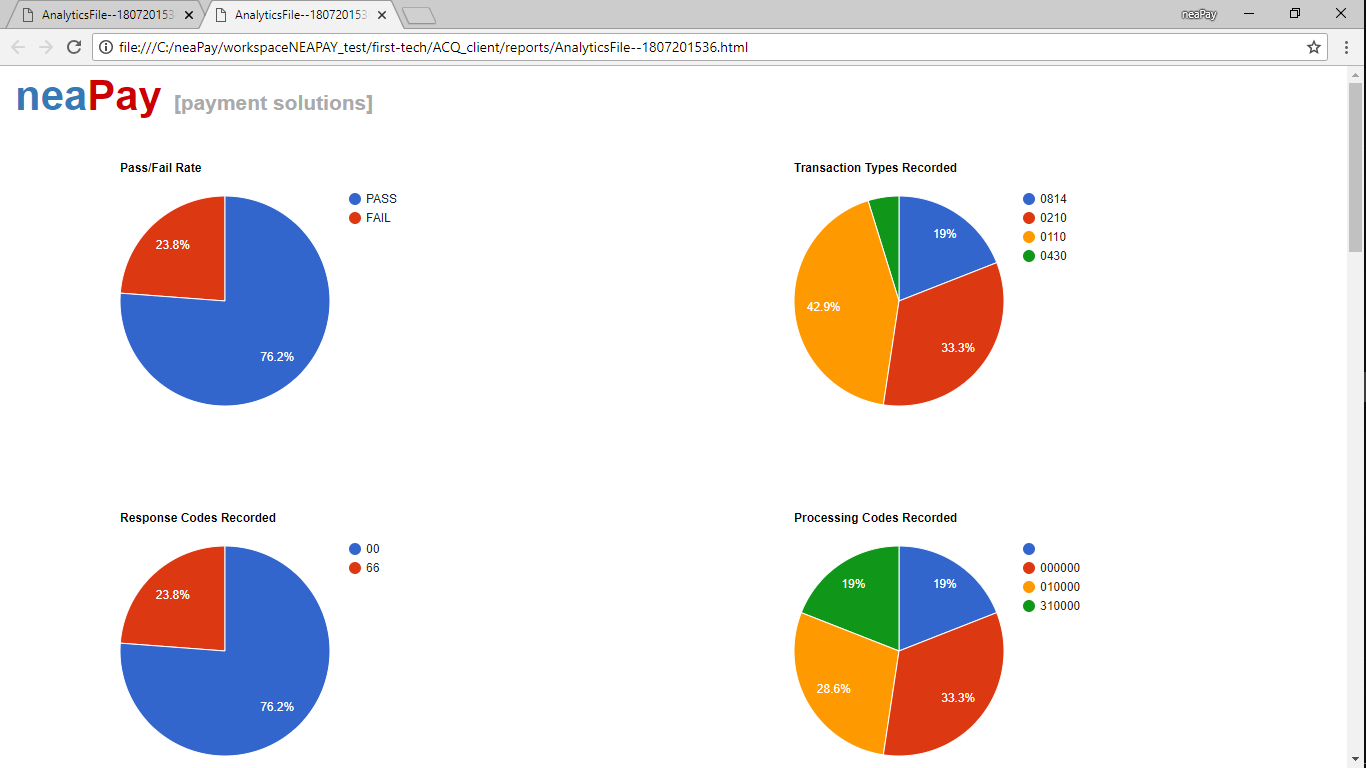
Check the Acquirer test case results:
ACQ: ************************** TEST PASS **************************
ACQ: RC Received:00 RC Expected:00
ACQ: Tests Executed:1
ACQ: Tests Passed :1
ACQ: Tests Failed :0
Congratulations! You have successfully simulated your first transaction with your converter!
If you manged to come this far, you are ready to continue to configure your converter to match your own specification or to do a test run for production, in Docker.
Run in Production

For running in production we reccomend running the converter in headless mode inside a container.
Headless mode is achieved by disabling the UI in config.properties. If you add this line, you will disable the UI.
gui.disabled=true
By default the converter comes with a Dockerfile and also with a configuration parameter to switch off the UI.
Automatically all output goes to standard out, where it is captured by the container.
Cloud providers usually have solutions for these los, storage or export to data lake analytics.
Deploy with Docker to Test
1. Install docker.
Docker DESKTOP
Deploy with Docker to Production
Step 0. Install tools.
Install unzip
sudo yum install unzip
unzip -v
Docker SERVER
| Platform | x86_64 / amd64 | ARM | ARM64 / AARCH64 | IBM Power (ppc64le) | IBM Z (s390x) |
|---|
| CentOS |
yes |
|
yes |
|
|
| Debian |
yes |
yes |
yes |
|
|
| Fedora |
yes |
|
yes |
|
|
| Ubuntu |
yes |
yes
|
yes |
yes |
yes |
Step 1. Deploy delivery
While on the VM, execute first OR second command, edit to match your delivery link:
wget -O /tmp/neapay_delivery.zip 'https://link_neapay_delivery.zip'
curl -o /tmp/neapay_delivery.zip 'https://link_neapay_delivery.zip'
Step 2. Unpack delivery to location
Assume the delivery is a zip file called neapay_delivery.zip. You need to unpack this
mkdir ~/neapay/
unzip /tmp/neapay_delivery.zip -d ~/neapay/
Step 3. Run server or several servers
Assume the converter was delivered in a folder called "neapayconverter". All you need to do is execute the script that starts it with Docker.
cd ~/neapay/neapayconverter
./start_neaPay_Docker.sh
If you have several converters, you either have a composer file or you need to start manually each of the converters
cd ~/neapay/neapayconverter2
./start_neaPay_Docker.sh
The same package can be deployed to the test environment. So it is likely that teh delivery also contains other folders, for example simulators for triggering transactions or web servers in case the converter converts to a web host format.
They get unpacked anyway. Do not start them, they are not needed. If you do though, nothing bad will happen
Step 4. Redeploys, changes
In case of a redeploy, the procedure can be repeated from start
In case of a configuration change, the script "start_neaPay_Docker.sh" can be run again.
The script will automatically find the running container, kill it, remove it, then find the image, remove it, rebuild a new container, and start it. No need to take care of anything about that. 
Step 5. Container Logs
Run the following command to see the logs of the converter that is called "neapayconverter"
docker logs neapayconverter
If you do not know how your running container is called, run the following command to see running containers
docker ps
Logging options
The converter by default runs in several ways and logging options are available for all.
1. Standalone on windows. Ideal for test situations.
The logs are displayed in standard to the UI console, if activated, or to standard out, if UI is disabled.
Enhanced logs below can be generated.
2. Standalone on Mac or Linux. This can apply to Test or Production situations
The logs are displayed in standard to the UI console, if activated, or to standard out, if UI is disabled.
Enhanced logs below can be generated.
UI mode is not suitable for production situations.
3. Container on any platform
All output to system.out
Enhanced logs below can be generated.
Enhanced logs generated automatically
Options to generate HTML or CSV reports are available, as well as sending transactions live (real-time) to another ISO8583 host (warehouse), SQL database or a HTTP host.