Add extra custom fields to the ISO8583 simulator
Posted on 10th Feb 2021 6154 views

Because Every ISO8583 implementation has its own particularities, variations and custom behaviour, the ISO8583 simualtor from neaPay is designed from the begining for super fast configuration and customization.
Adding or removing extra fields or changing their behaviour is designed from the begining to be ultra easy.
Adding extra, custom fiedls to the ISO8583 simualtor is very easy.
Edit the spreadsheet and save, and you are done with test data configuration.
Edit the message that reads the test data and you can use the data in the simualtor
Edit the ISO8583 message fields building behaviour, and you have loaded the data into the transaction.
Edit Test Data Structure
In order to edit ISO8583 test data structure for the neaPay simulator, locate folder named test_data and open the spreadsheet inside.
The spreasheet will be called something like
ISO8583_TestCases_v3.5.xlsm
Inside the spreadsheet file you will find several sheets, and for this example we will add a field on the Acquirer Sheet, which holds Acquirer specific data.
Edit ISO8583_Acquirer sheet to add a new field, a new column.
For examplea add after column DE126, columns DE126.1, DE126.2, DE126.3 and so on, to be used as subfields. DE126 = data Element 126
Add values on the columns.
Press "Save Test Data CSV" button within the sheet. IMPORTANT!
That button exports csv. Check that on disk, file "ISO8583_Acquirer.csv" has been updated.
Now the test data is updated.
Edit Acquirer sheet reading message
The Acquirer sheet is being read in the simulator like a normal connection.
The communication of the simulator with via the connection is done via a message.
All messages are configured in script_variables.js.
If you want to learn how to find out where a connection is used, read section below . Otherwise skip to section below.
All connections are defined in script_connections.js
To find out how the "connection" to this test data is read, open script_connections.js and locate the name ISO8583_Acquirer.csv
The name of the connection is "AcquirerDataFile"
Search for "AcquirerDataFile" in script_acquirer.js
The line that uses this connection is
receivedAcquirerDatamessage = receive(AcquirerData, AcquirerDataFile, true);
Which can be read as:
"receivedAcquirerDatamessage" takes values from receiving "AcquirerData" messages from "AcquirerDataFile" connection.
Update the test data reading message
If we want to read the updated data structure, then we need to update the structure of the message that reads it.
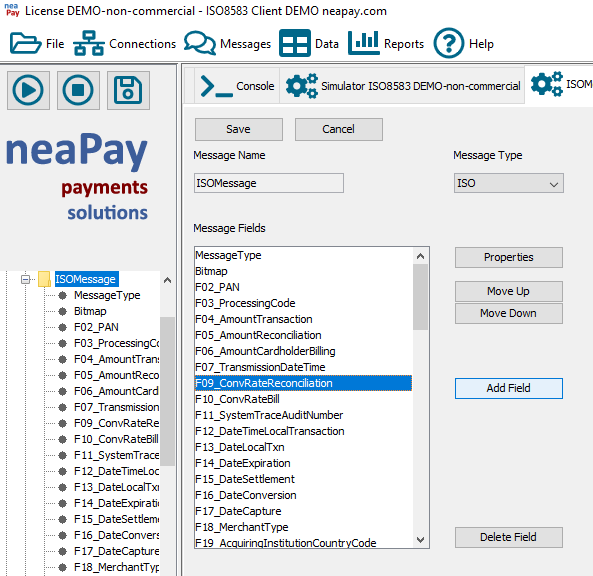
We go to script_variables.js and locate AcquirerData message
This message has all the columns of ISO8583_Acquirer sheet mapped to fields.
There is no naming correspondence, the fields are read from the csv file "ISO8583_Acquirer.csv" in order, meaning the 20th column goes to 20th field, no matter the name.
We will need to add our fields after field F126.
Copy this row to the next (duplicate), for as many rows as you have added columns to the sheet.
Use suggestive names for the fields, because these names will be used in the scripts, later.
For example F126_1, F126_2, F126_3.
Now, if you start the simulator, these fields will be automatically read and available. But not used, Yet.
Use the values of the new fields.
The best approach is to look at existing scripting.
Simples way is to look up where field 126 is used, so search F126 in script_acquirer.js but we notice we do not use it.
So search for other fields for reference, like F125 or F127.
We find function
function build_F125_Reserved{...}
and we can duplicate it into
function build_F126_Custom{...}
and add a call to this funtion to
function buildMessage(acquirerDataFromCsv);
This is where we call only the functions that we need to populate the fields.
Script building the field
In this function you can script the functionality you need, to populate this field.
Look at other functions and use various methods to populate the data. You can populate it automatically with date and time, or you can copy the values from the test data sheet.
For example, if you want to set the value of F126 as a concatenation of its sub-fields, you can script it like below.
function build_F126_Custom(acquirerDataFromCsv) {
setVal(isoMessageAcqRq.F126,
   acquirerDataFromCsv.F126_1.value+
acquirerDataFromCsv.F126_2.value+
acquirerDataFromCsv.F126_3.value
   );
 setBitON(isoMessageAcqRq.F126.bitmap_position)
}
Some scripting skills are required for this section.
Contact us if you need help.
Keep in mind that the ISO8583 format is automatically protected by the core, all you need to supply is the value. The core will automatically set the lenght, trim or pad, convert , as needed.