Deploy, run and generate with neaPay Card Data Generator
Posted on 8th Feb 2019 21441 views
Deployment instructions:
1. Deploy java 1.8 runtime environment to your system and use it as default. Java 8 .
Alternatively, if you cannot do that, download jre1.7 from our website as a zip https://neapay.com/delivery/jre1.8.zip. In this case, unpack jre1.7.zip to the folder where the Card Data Generator will be deployed. E.g. C:/neaPayCardDataGenerator/jre1.7
2. Stop previous instances of the neaPay ISO8583 products.
3. If the received archive has an extension of *.zip.neaPay, rename the file and remove the .neaPay extension, so the extension will be .zip. (E.g. rename neaPay_demo_delivery.zip.neaPay to neaPay_demo_delivery.zip)
4. Unpack “neaPay_demo_delivery.zip” to the same folder where folder jre1.8 was created.
5. Go into folder and run start_neaPay.bat. For MAC and Linux use start_neaPay.sh. Press the Start button at the top and it will show a message that it is waiting for a connection. That means it has started.
6. Congratulations, your Card Data Generator is working! Write in the contact form below if it is not and you need help!
Once you have received and successfully deployed your ISO8583 Card Data Generator from neaPay, it is time to take it for a spin.
Generating card data is easy:
1. Go to the deployment folder where you have unpacked your Card Data Generator and make sure you have jre1.8 folder next to it (E.g. C:/neaPayCard Data Generator/ISS_auth)
2. Go into folder cardsGenerator and run start_neaPay.bat. For MAC and Linux use start_neaPay.sh. A new window called neaPay – Card Data Generator will start.
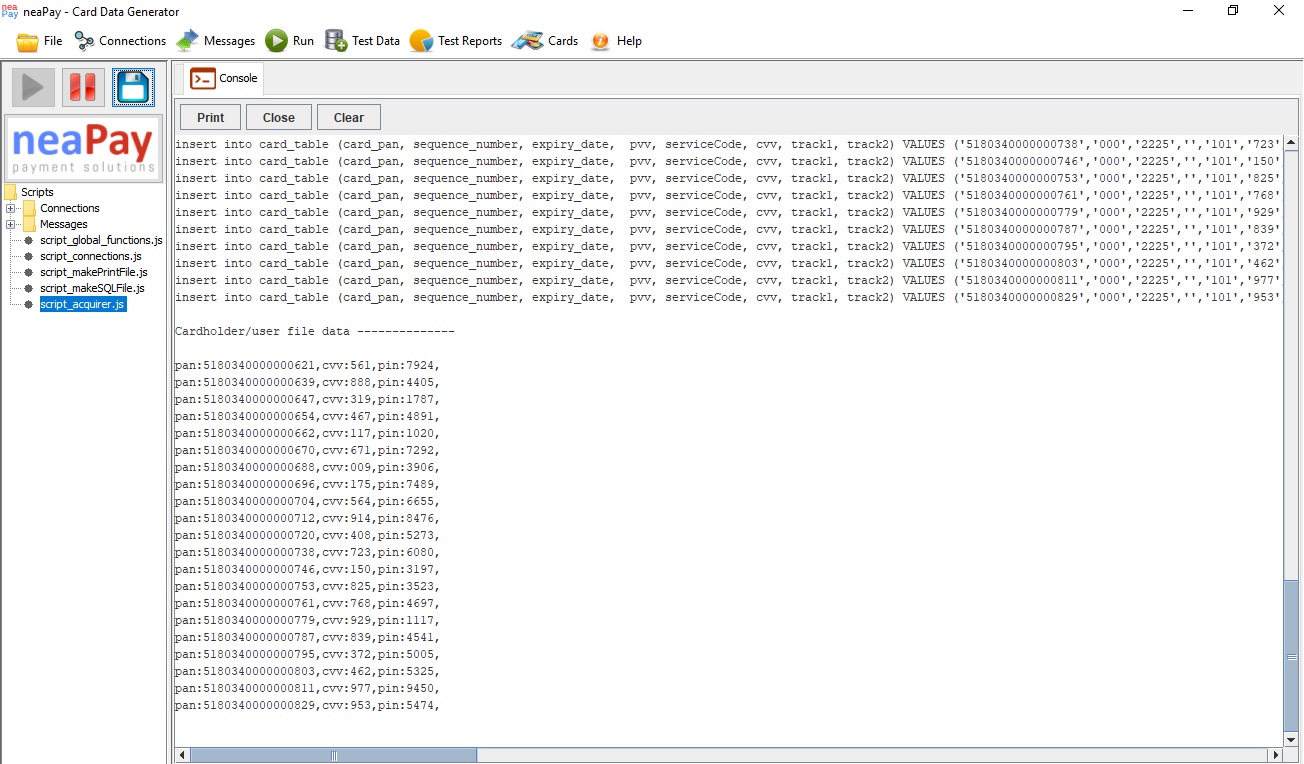
3. Press the Start button at the top left of the Card Data Generator (Green Play button). Card Data Generator has started and generated card data
Making adjustments to JavaScript to generate desired set of card data:
1. Once the Card Data Generator is open, press stop, right click “script_acquirer.js” from the left menu, click edit. In the first part you can see lines resembling the following:
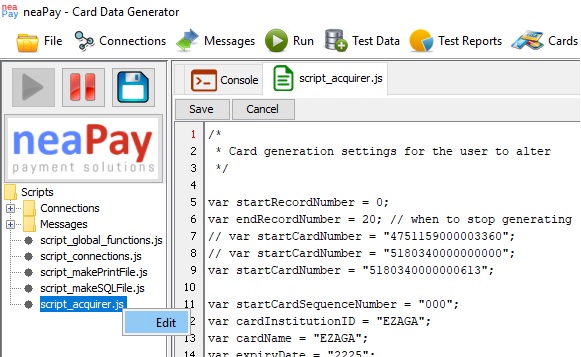
var startRecordNumber = 0;
var endRecordNumber = 20; // when to stop generating
// var startCardNumber = "4751159000003360";
// var startCardNumber = "5180340000000000";
var startCardNumber = "5180340000000600";
2. Change “var endRecordNumber” to set the number of cards that you want to be generated
Change “var startCardNumber” to change the number of the card from which the Card Data generator will start the generation of card data
Press Save button above the script
3.Press Clear button above the console to clear content of the console. Press Start button. Card Data Generator has started and generated card data from the desired card number
4. In the folder cardsGenerator/generate there will be two new files, a CSV file and a SQL file with the date and time of generation. The CSV file can be sent to card printing company, the SQL can be imported to your own database.
Congratulations! You have successfully deployed, run and generated card data with your Card Data Generator!